I remember tinkering in my garage, just trying to figure out the perfect placement for every single bracket in my Chevy 350 engine.
If you’ve found yourself in a similar pickle, or you’re just passionate about restoring and fine-tuning your 350, you’re in the right place.
This article provides the Chevy 350 Bracket Diagram and will explore everything you need to know about it, explaining how it plays a crucial role in the engine system.
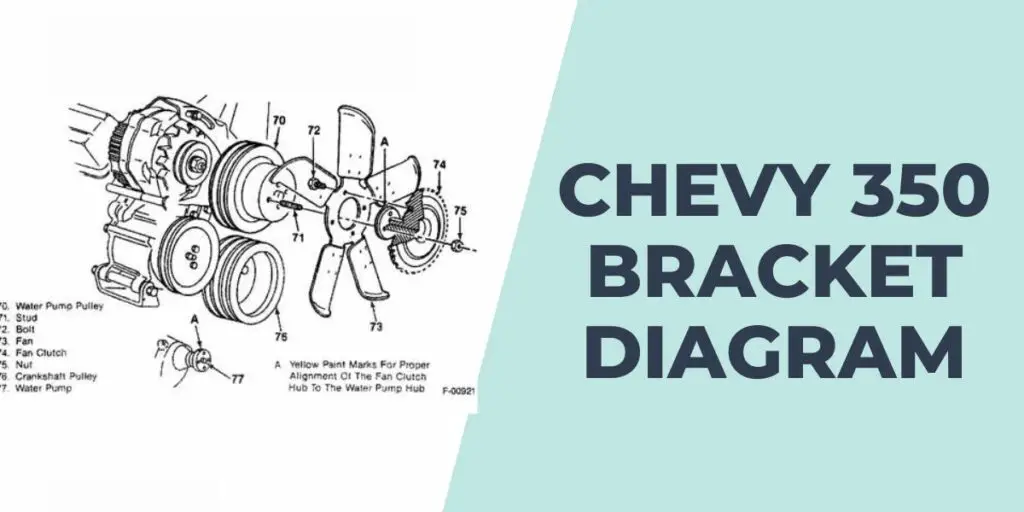
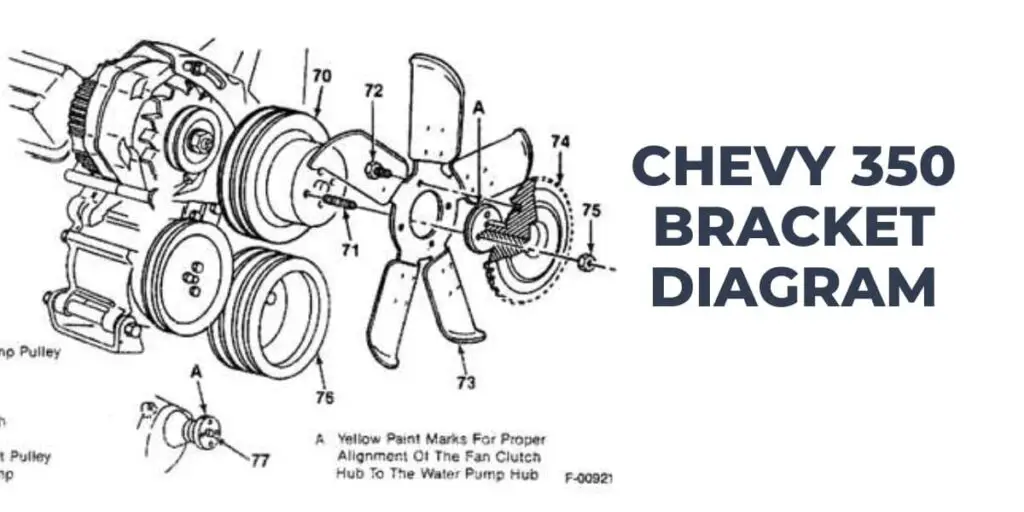
Chevy 350 Bracket Diagram
This is the Chevy 350 Bracket Diagram:
If you’re looking to delve even deeper, don’t miss our detailed guide on the Chevy 350 engine diagram for a comprehensive breakdown.
Understanding the Bracket Diagram of Chevy 350 Engine
The bracket diagram of the Chevy 350 engine is a visual representation of the positioning and alignment of various brackets in the engine system of a Chevy 350.
These brackets support and secure various components, ensure proper functionality, and prevent unnecessary vibrations or movements.
By referring to the diagram, you can easily identify the correct placement of each bracket. This allows you to effectively install, repair, or replace them as needed.
If you’re diving into the realm of Chevy 350 engines, don’t miss our guide on How to Set Timing on Chevy 350 without Timing Light for those moments when you’re left in the dark without your trusty timing light!
Components of The Chevy 350 Bracket Diagram
These are the components of the Chevy 350 Bracket Diagram:
- Alternator Bracket: The alternator bracket secures the alternator in place. It ensures that the alternator remains fixed and aligned with the other components, allowing it to generate electricity efficiently.
- Power Steering Pump Bracket: The power steering pump bracket holds the power steering pump securely. It helps maintain proper belt tension, ensuring smooth power steering operation.
- Air Conditioning Compressor Bracket: The air conditioning compressor bracket supports and stabilizes the air conditioning compressor. It prevents excessive movement and vibrations, ensuring optimal functioning of the air conditioning system.
- Water Pump Bracket: The water pump bracket secures the water pump, which plays a vital role in cooling the engine. It keeps the water pump in place, allowing it to circulate coolant effectively and prevent overheating.
- Idler Pulley Bracket: The idler pulley bracket supports the idler pulley, which helps maintain tension in the serpentine belt. It ensures proper belt routing and prevents belt slippage, contributing to the smooth operation of various engine components.
How to Fix Chevy 350 Engine Bracket Issues
Follow these steps to fix Chevy 350 Engine Bracket Issues:
1. Identify the Issue:
- Listen: Often, a rattling or squealing noise can indicate a bracket that’s either loose or misaligned.
- Visual Inspection: Look for any cracks, bends, or wear in the brackets and mounting points.
2. Gather Necessary Tools:
Typically, you’ll need a socket set, wrenches, screwdrivers, and a pry bar. Depending on the specific bracket, specialty tools may be required.
3. Tighten Loose Brackets:
- Ensure the engine is off and cool.
- Use your wrench or socket set to tighten any loose bolts or nuts. Do not overtighten, as this can cause damage or strip the threads.
4. Replace Damaged or Bent Brackets:
- Remove the damaged bracket. This might require removing additional components or belts.
- Compare the old bracket with the new one to ensure compatibility.
- Install the new bracket. Ensure it’s correctly oriented and aligned before tightening it down.
5. Check Alignment:
For pulley-driven components, alignment is crucial. A misaligned bracket can cause belts to wear unevenly or even snap.
- Use a straight edge or laser alignment tool to check the pulleys’ alignment.
- Adjust the bracket until the pulleys are aligned correctly.
6. Inspect Bushings and Mount Points:
Some brackets have rubber bushings or isolators. These can degrade over time and might need replacement.
- Check for signs of wear or degradation.
- Replace if necessary, ensuring the new parts are compatible with your Chevy 350 engine model.
7. Reinstall any Removed Components:
If you had to remove belts or other components to access the bracket, make sure to reinstall them correctly. Check the tension on any belts and adjust as necessary.
8. Test the Engine:
Once you’ve made the necessary repairs or adjustments:
- Start the engine and listen for any unusual noises.
- Ensure all components are working correctly and observe any belts to ensure they’re tracking properly.
9. Regular Maintenance:
To prevent future bracket issues:
- Perform regular checks on all brackets, especially after rigorous driving conditions.
- Keep an eye out for rust or any signs of wear.
- Periodically tighten any bolts or nuts to ensure they remain secure.
If you’re looking to fine-tune your engine even further, don’t miss our step-by-step guide on how to adjust valves on a 350 Chevy.
Benefits of The Chevy 350 Bracket Diagram
The Importance of the Chevy 350 Bracket Diagram includes the following:
- Ensures Proper Component Alignment: The bracket diagram of Chevy 350 engine provides a clear understanding of the correct alignment of components within the engine system. This ensures that all the parts fit together precisely, optimizing their performance and longevity. Proper alignment also reduces the risk of damage due to friction or misplacement.
- Facilitates Easy Maintenance: By referring to the above diagram, mechanics and car enthusiasts can easily locate the brackets and associated components during maintenance or repairs.
- Enhances Performance and Reliability: It acts as a guide to ensure that each bracket is securely fastened, preventing any unnecessary movements or vibrations. This stability translates into improved performance, reduced wear and tear, and enhanced reliability of the engine system.
For insights on the common hiccups you might face, check out our guide on common problems with the Chevy 305.
Frequently Asked Questions
Here are the Frequently Asked Questions about the Chevy 350 Bracket Diagram:
What is the purpose of the Chevy 350 bracket diagram?
The Chevy 350 bracket diagram is a visual guide for understanding the correct placement and alignment of brackets in the engine system. It ensures proper installation, maintenance, and optimal performance of the Chevy.
How often should I check the bracket alignment?
It’s advisable to check the bracket alignment during regular maintenance intervals or whenever you notice unusual vibrations, noises, or movements in the engine system. Timely adjustments or replacements can prevent further damage and maintain optimal performance.
Can I replace brackets on my own?
If you have sufficient knowledge and experience in automotive repairs, you can replace brackets on your own.
Are aftermarket brackets suitable for the Chevy 350?
While aftermarket brackets may be available, it’s recommended to use genuine or high-quality brackets specifically designed for the Chevy 350. These brackets are engineered to meet the required specifications and ensure compatibility with the engine system.
Conclusion
Understanding the Chevy 350 bracket diagram is essential for maintaining, repairing, or optimizing the performance of your Chevy 350 engine. By referring to the diagram, you can ensure proper alignment, secure installation, and enhanced functionality of various brackets.
However, remember to consult the diagram during maintenance procedures and seek professional assistance if needed. Keep your engine running smoothly and enjoy the reliable performance of your Chevy 350!
